Playing Catch with a Purpose
Playing Catch with a Purpose
Playing catch, and more importantly throwing the ball takes balance, leverage and forward momentum. While throwing a baseball seems like a relatively simple process, it is actually one of the most important skills in the game itself. Below, we have broken the throwing process down in 5 steps:
Step 1) Foot Plant

 Just as the ball reaches your hand (when playing catch), the first step will begin with the throwing side (right handers starting with their right foot, left handers with their left foot). Here, the pivot foot plants down at a 45-degree angle (remember a 90º angle is when you pitch). By placing your lead foot in this angle, it will enable one’s front shoulder and hip to line up with the target.
Step 2) Balance
When the lead leg foot (non-throwing side) is lifted into a balance position, both legs & feet should now be in a 45-degree angle (pointing in the same direction). During this phase, both hands should be below your chest and ideally at waist height.
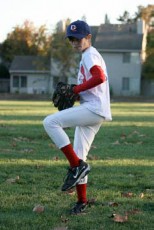
Step 3) Forward Motion
Once you begin your forward movement toward the target and just before your lead/front foot touches the ground, both hands will break from one another. Your throwing arm goes directly back to the throwing position while at the same time your lead glove hand points directly at your target.
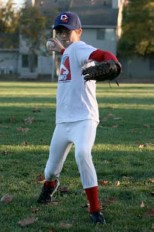 previous arm action article.)
Step 4) Foot Strike
This next step is the most forceful motion of your throw. As your landing foot strikes, several things will occur:
- A majority of your weight is transferred to your landing foot.
- Your knee should absorb the weight and be bend between a 45- 90º angle
- As your hands split apart, your chest opens up toward the target.
- Your lead glove hand pulls your non-throwing shoulder down, thus creating your right/left-throwing elbow to lift to shoulder height.
- Remember, when the glove is pulled down, it does not pass your waist)
- As your throwing elbow reaches shoulder height, it is now leading your ball hand toward the target
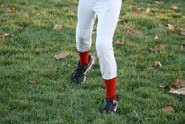
Step 5) Release, Follow through & Balance
As you release the ball, all of your weight should be now placed on your plant foot. This is why it is imperative to obtain good balance on the ball of your foot. After the ball has been released, your throwing hand should continue across the plane of your body and end either at your thigh or even better, below your knee. During this phase, your eyes should remain level as well as both shoulder blades. Important Note: The terminology, «stay squared after your throw» simply means that a player maintains equal balance between your legs after the throw. By doing so, you keep yourself from falling off to one side or the other.
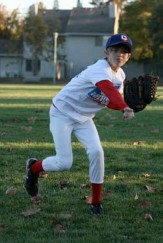

Note:
Education and the continued reinforcement of proper mechanics play a critical role in the development of young players. Despite the challenges a volunteer coach or manager has when dealing with such a broad range of skill levels in youth baseball, it should be noted that creating good fundamentals and building a solid base must be as equally as important to being a positive role model. We have seen all to often that if a player or pitcher can throw with relative accuracy, many younger level coaches and parents simply use the «if it ain’t broke, don’t fix» rule and spend more time on those with lesser skills. We understand about the time constraints in practice, but do keep in mind that all players on the team must be evaluated on their individual skills rather than their ability compared to others.
If pitching is indeed an exaggerated form of playing catch, then initiating good throwing mechanics is essential to finding productivity on the mound or at any position. If young Little Leaguers play catch correctly and with a purpose, then getting the pitch over or around the plate (when given the opportunity) becomes relatively easy.

